Drywall Taping Hamilton - The Facts
Wiki Article
The 8-Second Trick For Drywall Mudding
Table of ContentsDrywall Mudding for DummiesAbout Drywall InstallationGetting My Hamilton Drywall Contractors To WorkThe Hamilton Drywall Contractors DiariesThe Definitive Guide to Ceiling Repair Hamilton
Mounting drywall is not brain surgery, yet it will go quicker and also look far better if you learn the basics prior to you begin (rather of after you're done). Drywall is one of the easiest-to-use as well as least expensive building materials in the world. Also a significant blunder will certainly make you chuckle, knowing you have actually lost little time and probably less than 5 dollars.We'll show you the techniques and devices the pros use to get the drywall job done quickly and in a means that makes taping as painless as possible.
Puncture the paper backing to get rid of the waste. To assist find where screws will walk around the room, mark the leading plate in any way locations where strapping or joists converge the wall surface. Picture by David Carmack With an assistant, raise the first panel into one edge of the ceiling (drywall repair Hamilton).
As the aide holds the panel, drive 5 screws, uniformly spaced, in a line across the panel's width as well as into the joist or strapping closest to the middle of the panel. Use the marks on the top plate to aid straighten the screws. Keep screws at the very least inch from all edges.
How Drywall Installation can Save You Time, Stress, and Money.
Repeat this five-screw line at each joist or piece of strapping. Proceed the row in very same style up until reaching the opposite wall. Beginning the following row ensuring all end joints offset the panels in the very first row by at the very least 4 feet. Suggestion: Include a screw next to any type of screw head that breaks the paper.
Mark that panel end where the measuring tape meets it as well as tape the distance. Cover package with an additional panel, and also connect it as symphonious 3; do not drive screws any type of closer to package than 24 inches. From the mark on the last installed panel, distribute onto the new panel the very same variety of inches taped previously, and also note the spot with an X.
Usage a measuring tape to make sure the very first panel's end will land in the center of a stud; if it won't, cut the panel as in Action 2. With a helper, hold the panel against the studs so that one side butts this page versus the ceiling panel and one end fits comfortably against the abutting wall surface.
8 Easy Facts About Drywall Taping Hamilton Shown
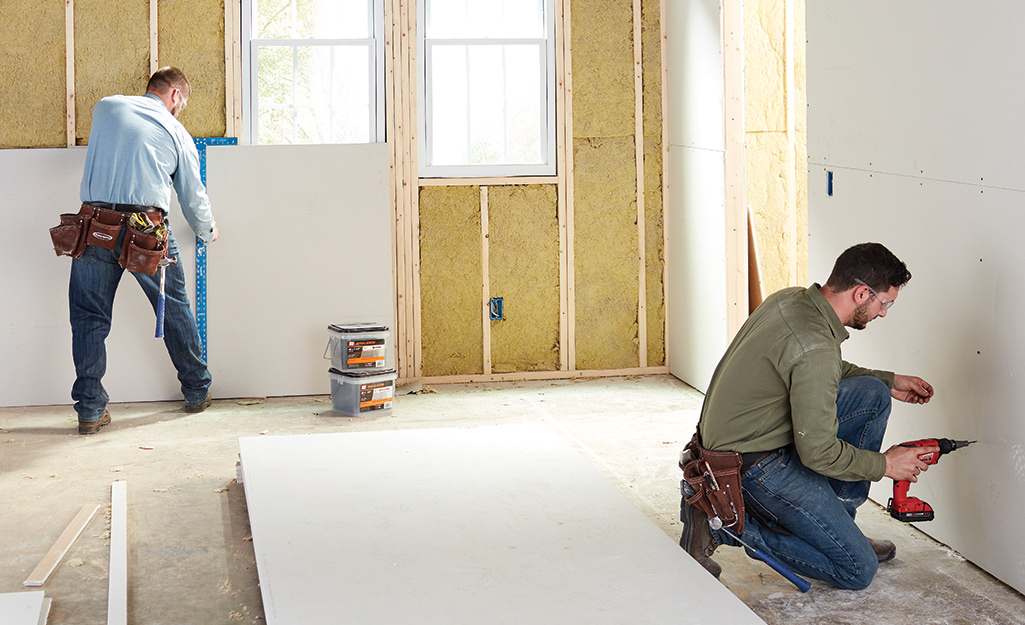
As symphonious 3, begin screwing into a stud near the middle of the panel and also job outward. Proceed hanging panels along the top of the wall surface, right over any kind of home window and also door openings. (The excess will be trimmed later on.) Ensure no seams associate a door or window edge.Don't screw panels to the mounting around the openings. Cut out the switch as well as outlet boxes following the very same procedure just like the ceiling boxes in Step 3: Mark package places before covering them with drywall, making sure not to drive any type of screws closer per box than 24 inches.
Overlap this revealed end with the panel on the adjoining wall surface, to make sure that the corner is totally framed in drywall. (With blueboard, the panel finishes do not overlap at outdoors corners; their ends land flush more tips here with the edge of the stud. This space will be filled later on with plaster.) Cover outside corners with a metal corner bead, cut to the height of the wall.
Secure the bead with 1 -inch drywall nails, hammered every 10 inches with the openings in each leg to make sure that the legs are tight to the wall as well as the corner is not distorted whatsoever. Do the very same on the adjacent wall surface. Picture by Gregory Nemec Drywall service provider Paul Landry thinks that carpenters frame wall surfaces so they are flat and also straight.
Ceiling Repair Hamilton Can Be Fun For Anyone

On exterior walls, it's uncommon to find a stud that bows into the space, since the sheathing holds it in area. When Landry does, his only choice is to power-plane the side of the stud back into alignment. We define the types of drywall and also where each type ought to be made use of.
We also give an ARTICLE INDEX for this topic, or you can attempt the page leading or bottom SEARCH BOX as a fast way to locate details you require. This short article series goes over and also provides an ideal construction methods direct to the choice and also installation of developing interior surface materials, carpeting, doors, drywall, trim, floor covering, home renovation designer lights, plaster, materials, coatings, and also seem control materials.
More About Hamilton Drywall Contractors
The building contractor or designer can play a key role in helping the homeowner pick finishes that are appropriate to the planned usage, in addition to offering the structural assistance and preparation work the products need permanently performance. Single-layer, 1/2-inch drywall is the default wall surface and also ceiling treatment in the majority of residential building.
Report this wiki page